
In laser welding applications, one common issue users may encounter is that the machine operates partially but fails to emit laser light.
This article explains the typical symptoms, root causes, and step-by-step solutions to help you quickly diagnose and resolve the problem.
Problem Description
During welding operation:
Gas is released normally
Wire feeding works properly
Red light (pilot laser) is visible
But no laser beam is emitted
This means the system is partially functioning, but the actual laser output is missing.
Root Cause Analysis
Under normal conditions, when gas is triggered, the laser output signal should also be sent simultaneously.
If the laser does not emit, the issue is usually related to one of the following:
The laser source does not receive the output signal (possible port or signal issue)
The laser source itself has a fault
Signal transmission between the control system and laser source is abnormal
It is important to note that:
A laser source showing no alarm does not necessarily mean it is functioning properly.
Troubleshooting Steps
Step 1: Check Control Signal Output
In principle, when the control box sends the following three signals, the laser should be triggered:
Enable signal
PWM signal
Analog signal
If your system has a monitoring interface, check the signal values during operation.
If all output signals show normal values, it indicates that:
The control system is working properly
The issue is likely external, most probably the laser source
In this case, it is recommended to contact the laser source manufacturer.
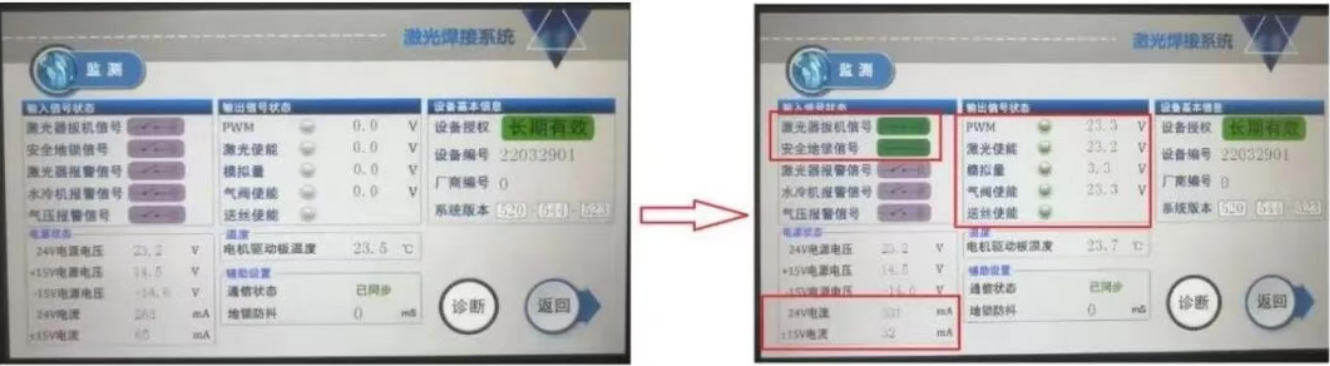
Standby and working status output signal display
Step 2: Manual Signal Testing (For Systems Without Monitoring Function)
If your system does not include a monitoring interface, you can manually test the signals.
You can do this by:
Running the machine in working mode (gas or wire feeding active), or
Using diagnostic mode to independently activate Enable, PWM, and Analog signals
Important:
Before measuring, disconnect the cable between the control box and the laser source (signal interface 3).
Step 3: Measure Signal Outputs
Use a multimeter to check the following signals:
Enable Signal
Pins 2 and 4 should output 24V
PWM Signal
Pins 6 and 7 should output 24V
Analog Signal
Pins 4 and 5 should output proportional voltage
At full power, the voltage should reach approximately 10V
Diagnosis Based on Test Results
Case 1: All Signals Normal, but No Laser Output
If all signals are correct and stable, but the laser still does not emit:
The issue is most likely with the laser source itself
Solution:
Contact the laser source supplier for inspection or repair
Case 2: Missing Enable or PWM Signal
If either Enable or PWM signal has no voltage output:
You can temporarily combine them for testing
For example:
Connect PWM signal to the Enable signal pin
This can help verify whether the issue is related to signal transmission
Case 3: No Analog Signal Output
If the analog signal has no voltage:
Further diagnosis depends on the red light condition
If the red light appears as a line:
The control board may be faulty
Solution:
Return to factory for repair or replace the mainboard
If the red light appears as a dot:
Check whether the 15V switching power supply polarity is reversed

Signal interface image
Key Takeaways
No laser output does not always mean the laser source is damaged
Always verify control signals before replacing components
Signal testing is critical for accurate troubleshooting
Proper diagnosis can save significant repair time and cost
Need Technical Support
If you encounter similar issues with your laser welding system,
ZS Laser provides professional technical support and remote diagnostics to help you quickly restore production.
Feel free to contact our team with your machine details and fault description.

WhatsApp
Scan the QR Code to start a WhatsApp chat with us.